|
You do not have to be a great artist to sculpt. What I have found out over the past couple of
years is that the more you do, the better you get. Just like painting you get better with practice. I started with little
things such as tables, shields, & monsters. The best thing about monsters is that they do not have to be scale, what I
mean is the feet can be too big, and still look good because it is a monster. The size of things is not important when you
start, because you develope your own style. Scale will come in time after practice.
The other thing I have learned is the tools make all the difference in the world. I started out sculpting
with a exacto blade, a tooth pick, a steel dart tip, and a wooden tool I took out of my wifes old nail polish bag. I
threw them into my black box. Which was my sculpting tool kit for miniature. I used sculpey and greenstuff, the sculpey is
good for practice and it bakes hard in 30 minutes in the oven. The greenstuff is more expensive and I saved it till I got
good. For a while I sculpted with the tools I threw in the box. It worked fine for some stuff, but I found myself needing
smaller tools. My mini tools are a direct result of that need. So tools are very important to miniature sculpting.
The next thing I did was layers, lots, and lots of layers. You have to build a miniature in layers.
I use copper wire to make a frame like a skeleton it helps hold the shape togeather. I put on a thin layer of putty on this
frame and let it dry. This is a skinny version of a basic shape I want. After this is dry I add basic muscle groups. Then
I let it dry again. You may be wondering what I do with the green stuff left over when a certain part is drying.
TRICK:" I put my green stuff in the freezer, yes the freezer. I read this somewhere and it works. The
longest I have left it is over night about 8 hours. I could not believe it, but I used it the next day. I do not make it a
habbit, but it saves time and money."
Back to sculpting-
I then start to add a layer of clothes or chainmail. My first attempt was a Dwarf and I did the body
and used a Warhammer Dwarf head to finish it, as well as the Warhammer Dwarf hands. I knew I needed more practice on faces
and hands, so I did'nt even try. Then I practiced on hands, faces, nose, ears, eyes, teeth, & hair. I did this
with green stuff to get a feel for it. After a bit of practice I did the Fat bar maid. Which was my second figure ever. Then
I did the Dwarf which was my third figure, then I lost count. Now I do all sorts of different pieces. I think the
practice and tools are the two things that improved my sculpting the most. Below are some tips for working with green stuff.
TIPS:
- Use water to blend green stuff to already dry green stuff.
- A flat tool works good for pockets, pouches, and hands.
- Layer the detail bit by bit and always let it dry.
- Anything less than 1mm is too thin to make a mold for.
- The other putties are brown, and a blue. They sand easier, and do not shred like green stuff.
- A 25 watt bulb on a 5# coffee can works to dry it faster.
- Use different mixes to get different results.
- Lubricate tools ( I do not very often, but you can )
- Experiment with mixing 1 putty with other putty.
- Use a piece of a removable pencil eraser for smoothing skin.
- Practice
| By - Joanne Sullivan |
|
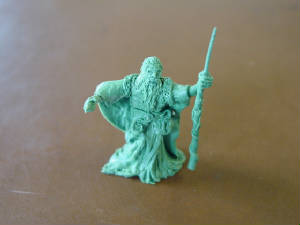
| My tools helped sculpt this. |
|